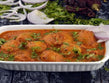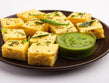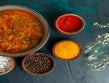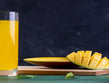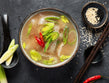

Make a quick and creamy coconut chutney using fresh coconut, green chillies, ginger, and roasted chana dal, blended to your preferred texture and mixed with curd for added tang. The recipe walks through simple grinding and tempering steps, along with tips and the right appliance support to achieve authentic flavour and consistency at home.
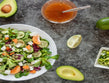
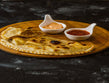
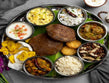
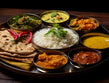
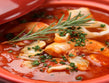
There is something magical about a freshly made coconut chutney sitting beside a plate of hot idlis or crispy dosas. It is one of those recipes that turns a simple South Indian breakfast into a comforting, wholesome meal. If you have ever wondered how to prepare coconut chutney at home, you will be surprised at how quick and forgiving the process really is.
Learning how to cook coconut chutney does not require years of kitchen experience. This coconut chutney recipe is perfect for anyone who wants fresh, homemade flavours without spending hours in the kitchen. Let us walk you through how to make a coconut chutney that tastes just like the one from your favourite South Indian restaurant using smart kitchen appliances .
Coconut Chutney Recipe
Overview
-
Prep Time: 5 minutes
-
Cook Time: 5 minutes
-
Total Time: 10 minutes
-
Cuisine: South Indian
-
Course: Accompaniment / Side
-
Servings: 4
-
Calories: Approximately 80 kcal per serving
Ingredients
For the Chutney Base
-
1 cup freshly grated coconut (or frozen coconut, thawed)
-
2 green chillies (adjust to taste)
-
1 small piece of ginger (about half an inch)
-
1 tablespoon roasted chana dal (also called fried gram)
-
Salt to taste
-
1/4 cup fresh curd (yoghurt) for a tangy flavour
-
1/4 to 1/2 cup water (as needed for consistency)
For the Tempering (Tadka)
-
1 tablespoon coconut oil or any neutral oil
-
1/2 teaspoon mustard seeds
-
1/2 teaspoon urad dal (split black gram)
-
1 dried red chilli, broken into two
-
A sprig of curry leaves
-
A pinch of asafoetida (hing)
How To Prepare Coconut Chutney: Step By Step Instructions
Preparing the Chutney
-
Add freshly grated coconut, green chillies, ginger, roasted chana dal, and salt into your mixer grinder jar.
-
Pour in about 1/4 cup of water to help the blending process.
-
Grind the mixture to a smooth paste. If you prefer a slightly coarse texture, pulse the grinder a few times instead of running it continuously.
-
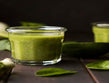
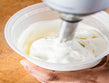
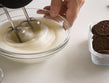
Transfer the ground chutney into a serving bowl. Stir in fresh curd and mix well. Adjust the consistency by adding a little more water if needed.
Preparing the Tempering
-
Heat coconut oil in a small pan over medium heat.
-
Put the mustard seeds and wait till they splutter.
-
Put urad dal. Allow it to turn light golden.
-
Toss in the broken red chilli, curry leaves, and a pinch of asafoetida. Stir for a few seconds until fragrant.
-
Pour the hot tempering over the chutney and mix gently.
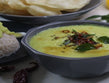
-
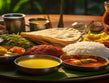
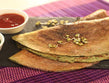
Serve immediately with idli, dosa, medu vada, or even as a side with rice.
Tips to Make the Coconut Chutney Recipe Better
-
Use fresh coconut whenever possible. It gives the chutney a naturally sweet, creamy texture.
-
Do not skip roasted chana dal. It adds body and a subtle nutty depth to the chutney.
-
If you like your chutney tangier, add a small piece of raw mango or a squeeze of lemon juice along with curd.
-
Grind in short pulses for a slightly coarse chutney, or blend longer for a silky smooth finish. The texture is entirely up to you.
-
Always make the tempering fresh and pour it while still hot. This releases the essential oils of the spices.
-
Avoid adding too much water at once. You can always thin it out later, but thickening a runny chutney is harder.
-
If you want a milder chutney, remove the seeds from the green chillies before grinding.
Why Wipro Appliances Make This Coconut Chutney Recipe Easier
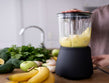
A good coconut chutney starts with the right grind, and that is where your mixer grinder matters most. The Wipro Elato 1000W Mixer Grinder is built for exactly this kind of everyday kitchen task. Its powerful 1000W motor, made with 100% pure copper winding, handles fresh coconut effortlessly without overheating.
What truly sets it apart is the Deep Flow Breaker (DFB) technology. It ensures that ingredients circulate properly inside the jar, giving you a smooth, evenly ground chutney in less time. The dedicated chutney jar is perfectly sized for smaller batches, and the stone-pounding stainless steel blades deliver the kind of authentic, slightly rustic texture that elevates homemade chutneys.
With four stainless steel jars, overload protection, and rotary speed control, this mixer grinder makes preparing coconut chutney hassle-free. It comes with a 2-year warranty and an extended motor warranty, so it is built to last.
If you are looking for a reliable mixer grinder to simplify your South Indian cooking, the Wipro Elato is worth considering. Buy now from the Wipro Appliances website.
Conclusion
Now that you know how to prepare coconut chutney at home, there is no reason to rely on store-bought alternatives. This coconut chutney recipe is quick, flavourful, and needs just a handful of pantry staples. Whether you are making a lazy Sunday breakfast or a quick weekday meal, knowing how to cook coconut chutney means you always have the perfect side dish ready. Pair it with your favourite South Indian dishes and enjoy homemade goodness every time.
FAQs
-
Can I make the coconut chutney recipe without a mixer grinder?
Technically, yes. You can use a mortar and pestle, but a mixer grinder gives you a much smoother and more consistent result. It also saves a lot of time and effort. If you want to learn how to make a coconut chutney quickly, a good mixer grinder is essential.
-
How long does coconut chutney last in the fridge?
If kept in an airtight container, fresh coconut chutney can be kept in the fridge for up to two days. However, it tastes best when served fresh, especially with the tempering still warm.
-
Can I use desiccated coconut instead of fresh coconut?
You can, but soak it in warm water for about 15 minutes before grinding. The texture and flavour will differ slightly, but it works well in a pinch.
-
What dishes go best with coconut chutney?
Coconut chutney pairs beautifully with idli, dosa, medu vada, uttapam, and even plain rice with ghee. It is a versatile accompaniment that complements most South Indian dishes.